I love yogurt all ways – made up sweet in a smoothie with fruit, savory with seeds and herbs, as a topping on meals or a spread on sandwiches; as a supplement to swig down doses of flax oil and molasses… the list goes on. It has always been an important staple in our home, and the benefits of eating cultured dairy are many. My only qualm, in past years, was with the countless plastic quart containers that accumulated with our yogurt consumption.
I don’t know how it took me as long as it did to discover how easy it was to make yogurt myself. It’s really, really easy!
There are many yogurt tutorials out there, I am sure, but we all do things a little differently so I thought I would share my method. Now that I’ve developed a rhythm, I find the process to be so easy I can do it almost without thinking. While it takes many hours from start to completion, the actual time required of you to be in the kitchen is maybe 10 minutes.
I make one gallon of yogurt at a time, but you can make any amount that works for your household. I like to make the most of my yogurt-making sessions, and typically we (mostly I) consume about a gallon of yogurt every 2 weeks.
Ingredients and Materials:
Milk
Plain yogurt (for your starter)
Jars or other lidded glass containers
A milk thermometer
A pot or pots large enough to hold your milk
Stainless measuring spoons
Stainless or glass stirrer
A few notes: You will need as much milk as the amount of yogurt you want to produce. For example, to make a gallon of yogurt you need a gallon of milk. I use Organic Valley Whole Milk. I wouldn’t recommend using skim, but a lower fat milk should work fine. You will need about 2 Tbs of yogurt per quart of milk. I use Nancy’s organic whole milk yogurt. You will need enough storage jars to accommodate the full quantity of milk, plus a small additional amount (equal to the quantity of yogurt starter you use).
To Make:
The short… heat milk, cool milk, mix in yogurt starter, pour into containers, incubate, refrigerate.
The long….
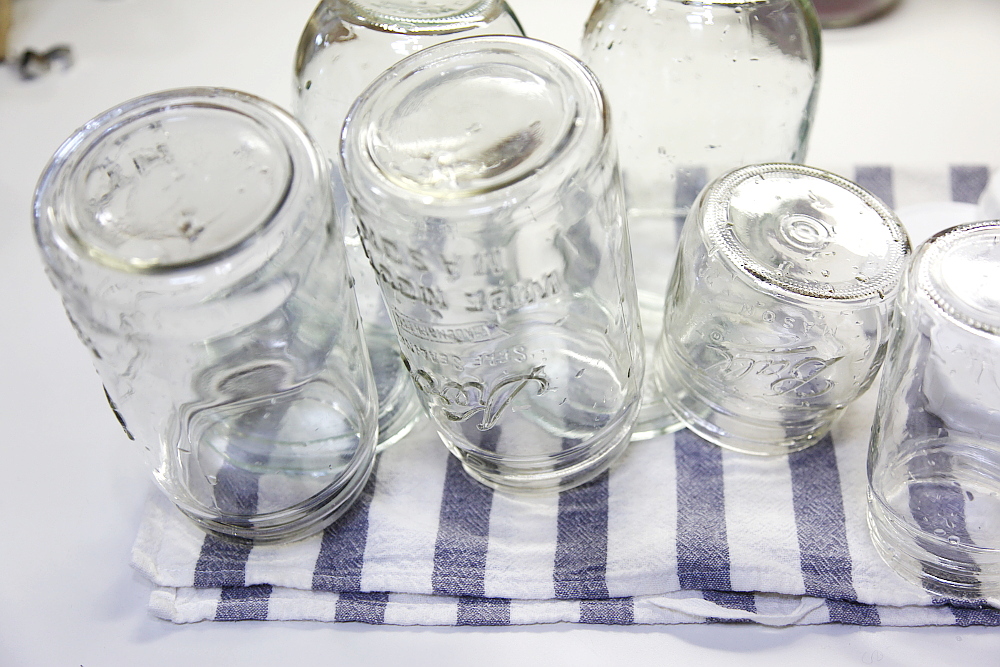
1. Clean all of your materials thoroughly (pots, jars, stirrers, etc). Since we are dealing with fermentation, and are attempting to cultivate healthy bacteria, rather than unhealthy bacteria, cleanliness is very important, and is the easiest way to insure success. You can use the sanitization method of your choice. I often just scrub everything thoroughly, rinse with very hot water, and then do a final rinse with purified water and drip dry (this isn’t “sanitization” per se, but it works well for me). Or, if you have a dishwasher, the sanitize cycle will do the work for you.
.
2. Pour your milk into your cook pot/s and heat to 175-180 degrees. I set my stove to a medium low temperature and let it heat slowly, so that if I get distracted it’s unlikely I will burn the milk. You do not want to burn your milk!
.

3. Once your milk has reached temperature, take it off the heat, stirring for a minute. Now let it cool, down to about 100-110 degrees. This will take some time, so you can go on to do other things for a while. (Heating the milk is a precautionary measure, to kill any unwanted bacteria that may compete with the bacteria you are trying to grow to make your yogurt. Cooling the milk is important so you do not kill your starter). Update: after some testing, it does seem true that heating creates a firmer yogurt. Thanks for the helpful comment Camille!
.
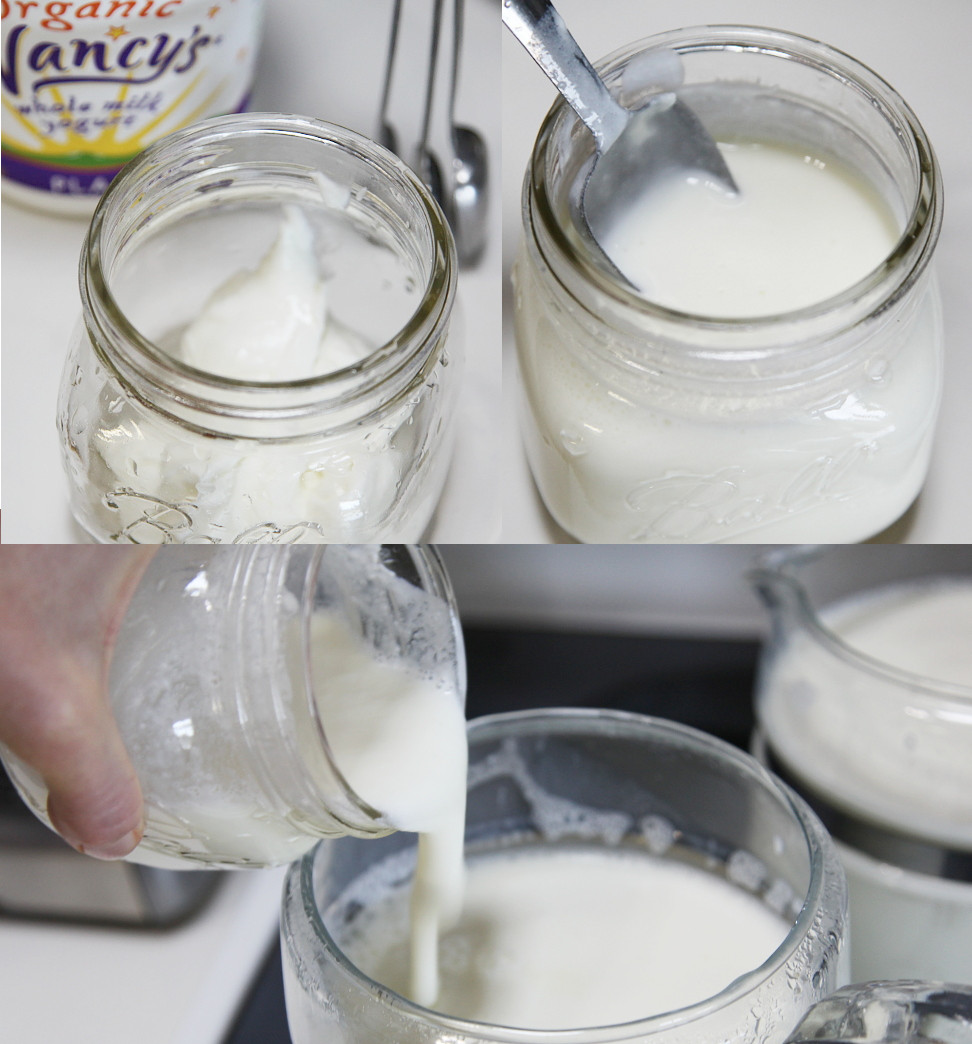
4. When the milk has cooled to 100-110, pour a small amount into one of your jars, and mix with the appropriate amount of yogurt starter (approximately 2 tablespoons per quart). Stir the mixture until the yogurt is dissolved, and then pour it back into your pot of milk. Now mix it in so that it’s well dispersed throughout the pot of milk.
.
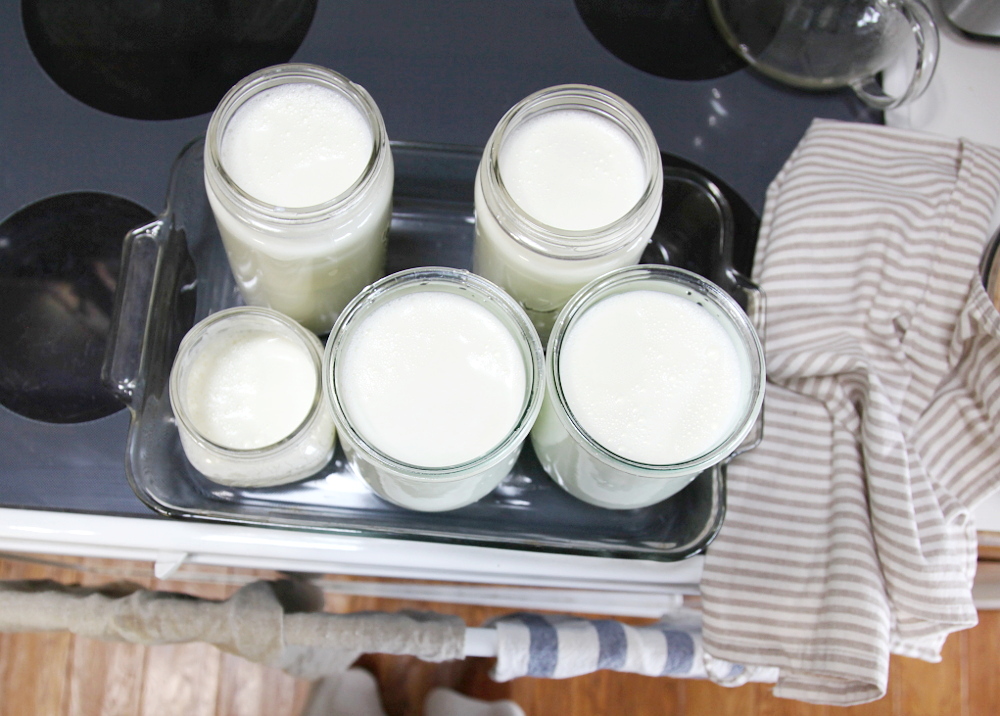
5. Pour your yogurt milk into jars, lid them loosely, and now it’s time to ferment.
.
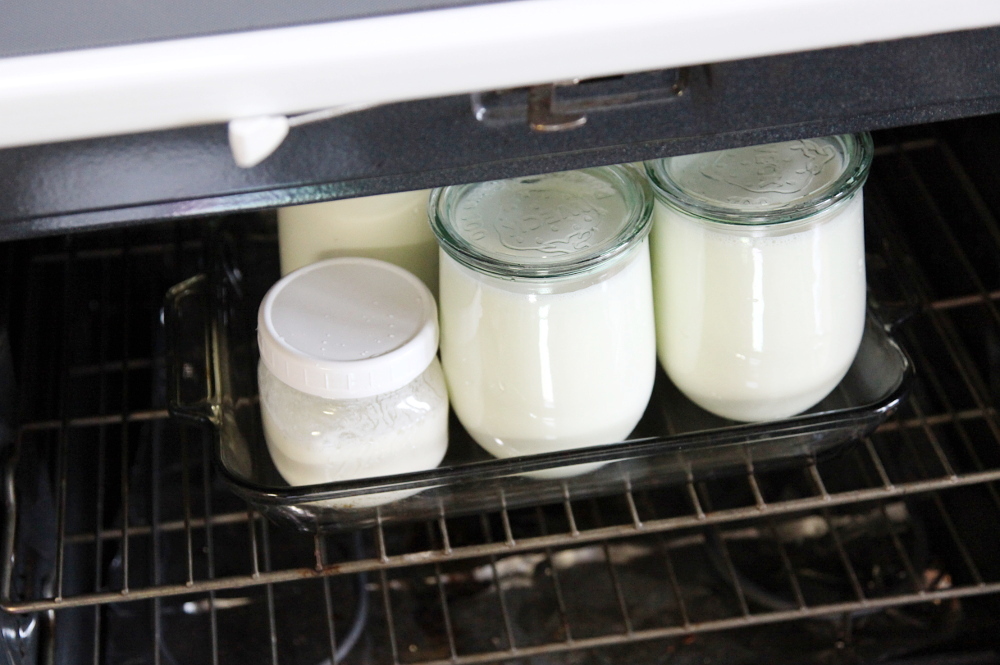
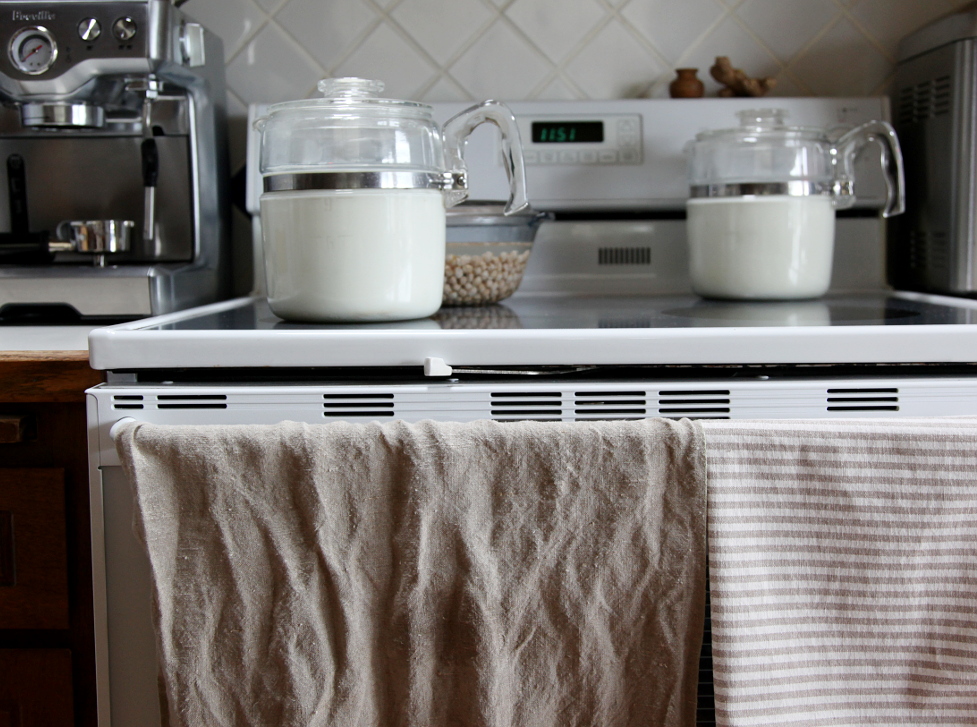
For the incubation period, I set all of my jars on a heavy glass bake pan and place it in the oven.* I heat the oven to 100 degrees and then promptly turn it off. Every few hours, I turn the oven heat back on (less than a minute, set at the lowest temperature possible) and then turn it back off. I usually leave my yogurt to ferment for 12-24 hours (this is relatively long, so you may like to experiment with different fermentation times).
*Note about using an oven: My oven doesn’t maintain a temperature lower than 170 degrees. It has a digital readout though, that tells me what temperature it is inside so I can monitor the rise and turn it off at the appropriate time. I have a rule for myself that I CAN NOT multi task while waiting for it to heat. It is too easy to get distracted. I have nearly cooked/killed my yogurt before. Take care not to overheat and kill your yogurt. If your oven can maintain a heat of 100 degrees on it’s own, you have the perfect yogurt maker. If you do not have a digital readout, a minute or less of heat is plenty. You are simply providing assistance in the fermentation process by creating a warm environment. I aim for around 100 degrees for yogurt fermentation, though lower temperatures will work as well. It will just take a little longer.
.
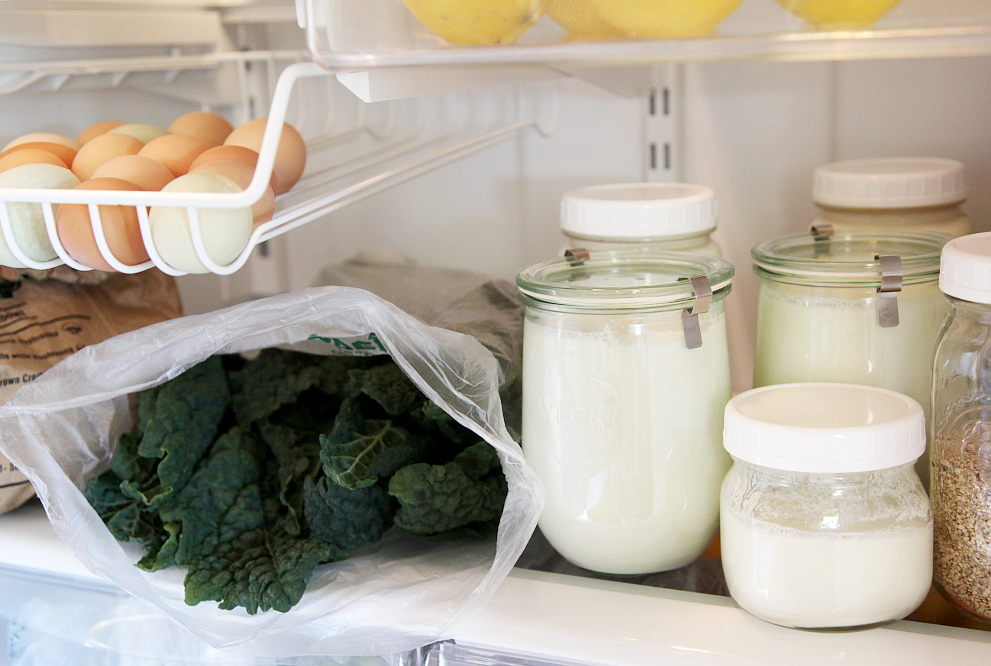
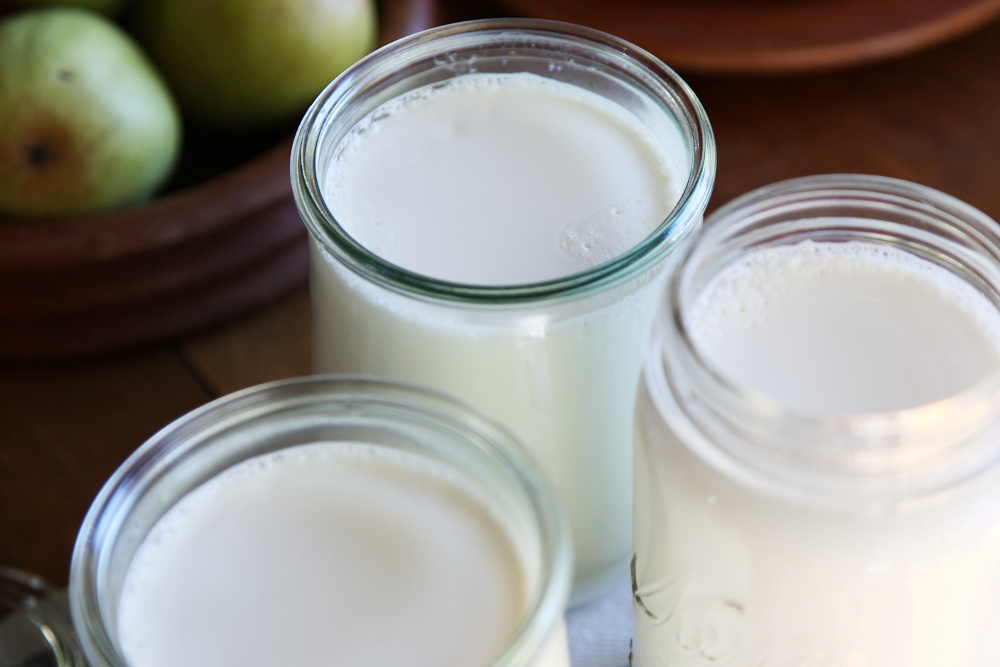
When your yogurt is finished, seal your containers and store them in the fridge.
I find it really satisfying to put away a gallon of fresh yogurt. Your yogurt will have firmed up quite a lot – something like creamy pudding – and will firm up a little more once it refrigerates. It should have that pleasant, slightly sour/sweet smell. Home made yogurt is not as thick as store bought (in my experience), but the thickness will depend quite a bit on how long you ferment for – firming up more (as well as becoming more tart), with longer fermentation time.
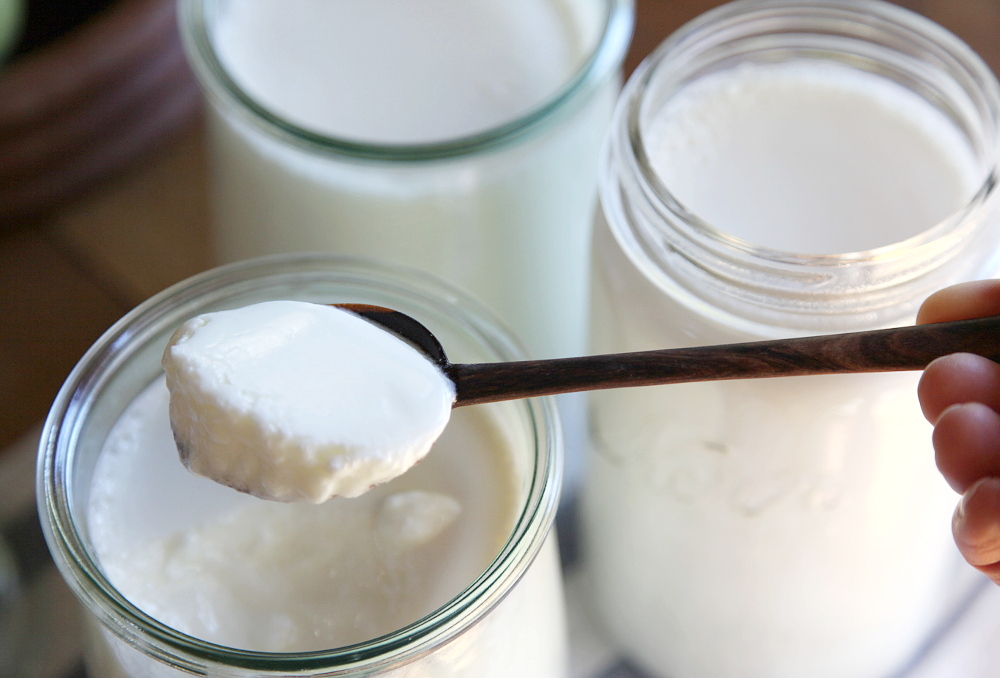
Now that you have your own yogurt made, you can use it as your starter for the next batch. I have read that if you are using your own starter, it should be no more than 2 weeks old, and if it is older than that to start with a new starter again, though I haven’t verified how important this actually is. I usually use my own starter 2 or 3 times, and then start with a new one again.
.
If you have never made yogurt before, I hope you try it! Feel free to ask any questions you might have.
Camille
Someone once told me that the heating-milk-up step is NOT about pasteurization as I, too, once assumed. Supposedly, it’s supposed to “set” the proteins or some such thing to make the yogurt thicker. I used to only heat pasteurized milk up to 110 and then add the culture, but heating it up and then cooling it down to 110 does make a thicker end product in my experience. Because I don’t have an oven (or regular electricity), I put my jars of cultured milk in a small cooler half-filled with hot tap water, and that works pretty great.
abby
Thanks for the input, Camille. I have considered just heating the milk to 110, as I know some folks don’t do the full heating/cooling process. I hadn’t heard that, about setting the proteins though. Will give it a try next time to see the difference (it will surely save some waiting time at the very least).
jodi
Thanks so much for taking the time to share this, Abby! Camille, if you by chance read this, could you give more specifics about your method using the cooler + hot water? Do you have to drain and add fresh hot water throughout the process? How long do you let it sit?
Camille
I just add very hot tap water to the cooler (up to the necks of the jars), and then shut the lid. I either let it sit all day or overnight, but I don’t change the water or anything.
jodi
Thanks, Camille… I’m going to give this a try!
natalie
abby, i am going to share this with luke! we have been wondering what’s the best way to start yogurt without a ton of fancy gadgets & equipment. this looks so easy. i’ll let you know how ours turns out!
abby
Yes, I’d love to know how it goes!
Denise
me too, I am going to give this a try!!
thank you for your helpful information.
Melanie Rouan
Thank you for sharing – and with beautiful pictures!
It’s been a while I wanted to try home made yogurt!
For how long will you keep it?
abby
Thanks Melanie! I have had it last for 3 weeks or so, without any problems of spoiling, though we usually eat it up sooner than that. I try to make what I know we will eat within about 2 weeks. Not sure the full recommended shelf life, but I would guess 3-4 weeks would be fine if the yogurt and interior of the container is kept clean.
Melanie Rouan
Thank you Abby!
Julie Alvarez
I’ve been making my yogurt for years now! I used to wrap a blanket and newspaper around the jars and let them throughout the night.
Then I used the oven, but it never worked well in my case.
Then I used the embers of the fireplace when I went to bed, putting the jars just as you do in a glass tray, near the embers… that worked perfectly!
Then I used the top of my iron woodstove, same process… letting them through the night and covered with a piece of thick fabric. Perfect.
Now I use a yogurt making machine, a simple one that keeps the temperature constant through 8 hours or so. Perfect of course… I use that one now because I don’t always have a fire running, and because this past year I needed all kinds of simplifying!
Thank you for sharing…
abby
Hey Julie, so glad to see you here! And I have enjoyed your yogurt making glimpses for years 🙂
Jean
Here is an easy way – the heat from oven light adds just the right temperature. I leave my yogurt in the oven overnight (about 9-10 hrs) and it’s always perfect.
Liesl
My Grandmother always made her own yogurt and got me interested in it as well. She even bought me a yogurt maker—keeps the temperature regulated nicely. Back before probiotics/live-cultures/Activia got big, I remember her making comments about how frustrated she was that the mainstream yogurts she bought as a starter wouldn’t work–that they were “dead.”
I always heard you shouldn’t use ultra-pasteurized milk otherwise I would use Organic Valley too. Is what you use ultra-pasteurized?
Anyway, thanks so much for sharing this How-To. I actually learned some things!
abby
Hi Liesl, A friend of mine asked me the same thing, about ultra pasteurized milk. Organic Valley is ultra pasteurized and it works just fine. Give it a try. It should be fun and easy with your yogurt maker. Glad to know you learned some things!
RUTH
Thank you for this recipe. I used to make yogurt regularly and lost my recipe. My yogurt has come out perfectly with this recipe. I love that it comes out thick every time. I incubate in the oven. Also, I love the idea of heating the milk in pyrex coffee pots. I have 2 of the same ones you have and it makes it so much easier. I used to heat up to 5 gallons at a time in a huge stock pot. I like this much better. And thank you for the great pictures.
3 tips for saving money (and lowering your carbon footprint) in the kitchen » Emerald Homestead
[…] and maintain the right temperature to allow the yogurt to set. Here are a couple recipes (one and two), and the new one I’m going to try uses a crock-pot and a slightly different method. While I […]
Abby
.
making my week | homemade sauerkraut – ShopInfusion
[…] free tortillas with adzuki beans, yogurt, sauerkraut, shredded carrot and romaine, and a dollop of salsa (I can’t seem to find the […]